A to-do list can be a great way to make sure you’re making progress on your daily tasks. Microsoft OneNote’s range of task management features provides a great solution for creating and managing everything from short lists to large projects. The following tips can help you effectively use OneNote for to do lists and improve your overall workflow.
How to create a OneNote to-do list
A OneNote to do list can be used to structure a variety of content and mark specific tasks.
- To get started, start OneNote and open a saved or new page.
- Then click the position in the document where you want to insert the checkbox. Alternatively, select a specific word or text you want to add a checkbox to.
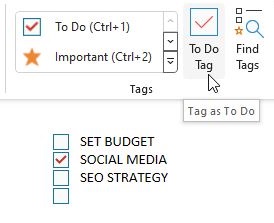
- In the next step, click on ‘Home’ at the top of the menu bar and navigate to the ‘Tags’ area. Here, tap on the ‘To Do Tag’ button, which is marked with a check mark.
- Just press Enter to extend your to do list on OneNote with more checkboxes.
When you have completed a task, click the checkbox next to the tag to indicate that you are done.

A to-do for example could be divided into 6 columns:
- Subject – Enter the name of the task and a short description if necessary
- Owner – Enter the name of the person responsible for the task
- Priority – Note whether the task is of high, medium or low importance
- Status – Note the current status of the task: Has the implementation already started or has it already been completed? In the latter case, the task can be checked off
- Start date – If there is a start date, you can enter it here
- Due date – Enter the date by which the task must be completed
Also read: 15 tips to use OneNote for project management
To-do list on OneNote – tips for formulating your tasks
Describe each task with a concrete action step where you intuitively know what to do. It should include a verb to encourage active action and distinguish it from a simple reminder or description. The more specific the verb, the better using for OneNote for to-do lists works.
Ideally, as soon as you see the verb, you should get a mental picture of yourself doing the task. A good example: ‘Create 3 personal budgeting templates for project y’. The task is clear and includes a call to action.
Following these rules will help you create a clear OneNote to do list with dates and avoid creating complex tasks that contain a series of smaller steps.
Organize and manage your todo list in OneNote
Is your to-do list actually useful? Follow these tips to ensure efficiency and get the most out of your it:
If you want to use OneNote for to do lists on different devices, make sure your notebooks are synced. Without a correct sync, you will not be able to find your tasks on your smartphone, for example. To adjust the settings, select ‘File’ and click the ‘View Sync Status’ button.

Another important step is to keep your to-do lists in OneNote up to date. Go through the lists once a week, check the priorities and delete completed tasks. This will keep your lists organized and increase your productivity.
Editing and deleting tasks
You want to rename entries in a Microsoft OneNote to-do list? Simply select the relevant task and type in a new title. Renaming does not affect the associated checkbox.
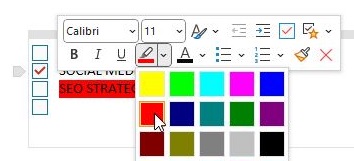
If you use OneNote for to-do list, you can also customize the design of the checkboxes. To do this, first select elements, such as text or single words, that are associated with the checkbox. At the top of the menu bar, you can now change various attributes such as font, font size, and color. For example, you can use bright colors to visually highlight important tasks.

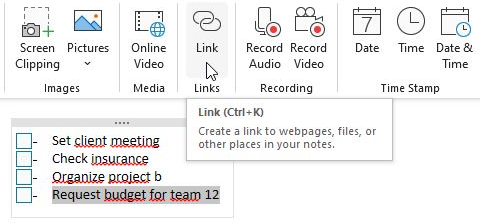
In addition to text, you can add images to your tasks to give the checkbox an individual touch. To do this, navigate to the ‘Insert’ tab at the top of the menu bar and then click on ‘Photo’ to select a suitable photo or graphic. You can also link any hyperlink to a checkbox via ‘Insert’ and ‘Link’. Deleting a task is also easy in OneNote. Just select the entry in the to-do list and press ‘DEL’ to remove the task and its checkbox.

Create tables with tasks
Tables with checkboxes can be a useful tool both in a professional context and for private purposes. First, create a new page in OneNote and give it a suitable title. Then navigate to the ‘Table’ option at the top of the menu bar via ‘Insert’. Once you have defined attributes such as the size, select fields in the table. Now click on ‘Home’ in the menu bar at the top and then tap on ‘To Do’ in the ‘Tags’ section. This will instantly add checkboxes to the table.

Integrating OneNote and Outlook
If you use OneNote for a to-do list, you can optimize deadline management by turning OneNote text into Outlook tasks.
To create an Outlook task in OneNote, simply open a section in your notebook and highlight text that contains a to-do item. Then click the red Outlook task flag button on the menu. Now the flag appears next to your task in OneNote and the task is added to Outlook. You can roll your cursor over the flag to see several details.
Improve your workflow with to-do lists in One Note
You want to create to-do lists in One Note and like working with keyboard shortcuts? Then simply use the shortcut ‘CTRL+1’. Compared to classic insertion via the menu bar, checkboxes can be integrated much faster this way. Especially when using numerous individual checkboxes on a page, using this shortcut is a smart solution.
If you have many tasks on different pages, you might want to get an overview from time to time. To find your tasks, go to ‘Home’, navigate to the ‘Tags’ section and tap ‘Find Tags’. Now you can sort the results by clicking on ‘Group Tags By’. Want to see what tasks are left? Just check the ‘Show only unchecked items’ box.

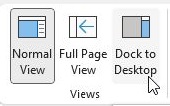
Using OneNote for to-do lists offers several advantages. The ‘Dock to Desktop’ feature can be another game changer and is easy to use. Just click ‘View’ and then tap on ‘Dock to Desktop’.

Now your Microsoft OneNote to-do list will switch to a compact view on the right side of your screen. This feature is perfect for multitasking, such as using the list while on a video call.

